
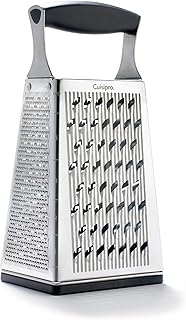
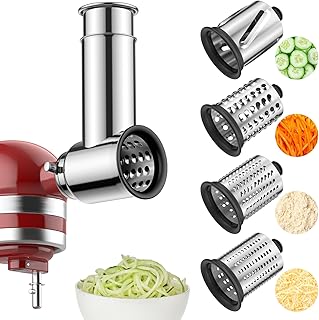
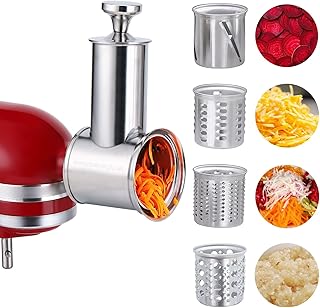
The KitchenAid cheese grater attachment is a versatile and convenient tool for any home cook or professional chef. It allows you to quickly and easily grate a variety of cheeses, from hard Parmesan to soft mozzarella, as well as other ingredients like vegetables and fruits. To use the KitchenAid cheese grater, simply attach it to your KitchenAid stand mixer and select the desired grating level. Then, feed the cheese or other ingredient into the grater and let the mixer do the work. The grated cheese will be evenly distributed and ready to use in your favorite recipes.
Explore related products


What You'll Learn
- Attaching the Grater: Securely connect the cheese grater attachment to your KitchenAid mixer
- Choosing the Right Blade: Select the appropriate grating blade for your desired cheese texture
- Preparing the Cheese: Cut cheese into manageable pieces to feed into the grater efficiently
- Operating the Mixer: Turn on the mixer at a suitable speed for grating cheese without over-processing
- Cleaning the Grater: Easily disassemble and clean the grater attachment after use
![]()
Attaching the Grater: Securely connect the cheese grater attachment to your KitchenAid mixer
To securely attach the cheese grater to your KitchenAid mixer, begin by ensuring the mixer is turned off and unplugged for safety. Locate the attachment hub on the front of the mixer, which is typically a circular port with a locking mechanism. The cheese grater attachment should have a corresponding end that fits snugly into this hub. Align the grater's connecting end with the hub, then gently push it in until you hear a click, indicating it's locked in place. It's crucial to ensure the attachment is firmly secured to prevent any accidents or damage during operation.
Once the grater is attached, you may need to adjust its position to ensure it's properly aligned with the mixer's motor. This can usually be done by loosening a locking screw or lever on the attachment itself, moving it to the desired position, and then retightening it. Refer to your KitchenAid mixer's manual for specific instructions on adjusting the attachment position, as this may vary depending on the model.
Before using the cheese grater attachment, it's important to familiarize yourself with its various components and functions. The grater typically consists of a main body, a grating drum, and a collection tray. The grating drum is where the cheese is grated, and it's usually removable for easy cleaning. The collection tray is designed to catch the grated cheese, preventing it from scattering around your kitchen. Make sure all parts are securely in place before beginning the grating process.
When you're ready to use the cheese grater, place the cheese in the collection tray and lower the grating drum onto it. Turn on the mixer at a low speed to begin grating the cheese. It's important to feed the cheese into the grater at a steady pace to ensure even grating and to prevent clogging. Keep your fingers away from the grating drum to avoid injury. Once the cheese is grated to your desired consistency, turn off the mixer and carefully remove the grater attachment.
After using the cheese grater, it's essential to clean it thoroughly to maintain its functionality and hygiene. Disassemble the grater by removing the grating drum and collection tray. Wash these parts in warm, soapy water, using a soft sponge or cloth to remove any cheese residue. Rinse thoroughly and dry completely before reassembling the grater and storing it in a safe place. Regular cleaning will help prevent the buildup of bacteria and ensure your cheese grater remains in good working condition for future use.
Mastering the Art of Cheese Cutting: A Guide to Using Cheese Knives
You may want to see also
Explore related products


![]()
Choosing the Right Blade: Select the appropriate grating blade for your desired cheese texture
The key to achieving the perfect cheese texture with your KitchenAid cheese grater lies in selecting the appropriate grating blade. Each blade is designed to create a specific texture, from fine to coarse, and understanding these differences is crucial for your culinary success.
For instance, if you're looking to create a fine, powdery cheese for melting or sprinkling over dishes, you'll want to choose the finest grating blade. This blade typically has small, closely spaced holes that will produce a delicate, almost fluffy texture. On the other hand, if you're aiming for a coarser, more robust cheese for salads or sandwiches, a blade with larger, more widely spaced holes would be more suitable.
When selecting a blade, consider the type of cheese you'll be grating as well. Softer cheeses, like mozzarella or brie, may require a finer blade to prevent them from becoming too mushy, while harder cheeses, like cheddar or parmesan, can handle a coarser blade. Additionally, think about the final dish and the texture you want the cheese to contribute. For example, a fine grate might be ideal for a creamy pasta sauce, while a coarser grate could add a nice crunch to a baked potato.
To ensure you're using the right blade for the job, it's a good idea to experiment with different blades and cheeses before committing to a purchase. Many KitchenAid graters come with multiple blades, allowing you to try out various textures and find the one that best suits your needs. And remember, the blade you choose can have a significant impact on the final outcome of your dish, so take the time to select the right one for optimal results.
Crafting Artisanal Cheese: A Step-by-Step Rennet Guide
You may want to see also
Explore related products


![]()
Preparing the Cheese: Cut cheese into manageable pieces to feed into the grater efficiently
To ensure efficient use of the KitchenAid cheese grater, it's crucial to prepare the cheese properly before grating. This involves cutting the cheese into manageable pieces that can be easily fed into the grater. Start by selecting a firm cheese, as softer cheeses can become mushy and difficult to grate. For best results, chill the cheese in the refrigerator for about 30 minutes before cutting, as this will firm it up and make it easier to handle.
When cutting the cheese, use a sharp knife to ensure clean, precise cuts. Aim for pieces that are roughly 1/4 to 1/2 inch thick and 1 to 2 inches wide. These dimensions will allow the cheese to fit comfortably into the grater's feed tube without jamming. If the cheese is particularly hard, you may need to use a slightly thicker cut to prevent the grater from becoming clogged.
For larger blocks of cheese, you can use a mandoline slicer to achieve consistent thickness quickly. However, be cautious when using a mandoline, as the blades are very sharp. Always use the hand guard that comes with the mandoline to protect your fingers.
Once the cheese is cut into manageable pieces, you're ready to begin grating. Ensure that the KitchenAid cheese grater is securely attached to your stand mixer and that the feed tube is positioned correctly. Start the mixer on a low speed and gradually increase it as you feed the cheese pieces into the grater. This will help prevent the cheese from becoming too finely grated too quickly and will also reduce the risk of the grater becoming clogged.
As you grate the cheese, keep an eye on the texture and consistency. If the cheese starts to become too finely grated or begins to clump, stop the mixer and adjust the feed rate or the thickness of the cheese pieces. By taking the time to properly prepare and grate the cheese, you'll achieve better results and ensure that your KitchenAid cheese grater operates efficiently and effectively.
Unveiling Olive Garden's Secret: The Cheese That Makes Their Dishes Irresistible
You may want to see also
Explore related products


![]()
Operating the Mixer: Turn on the mixer at a suitable speed for grating cheese without over-processing
To operate the mixer for grating cheese effectively, it's crucial to start by selecting the appropriate speed setting. The KitchenAid mixer typically offers a range of speeds, and for grating cheese, a medium to high speed is ideal. This ensures that the cheese is grated efficiently without being over-processed, which can lead to a mushy texture. Begin by placing the cheese grater attachment onto the mixer, ensuring it is securely fastened. Then, position the cheese block against the grater and start the mixer.
As the mixer begins to grate the cheese, monitor the process closely. You should hear a consistent grating sound, and the cheese should be accumulating in the bowl or container below the grater. If the cheese is not grating evenly, adjust the position of the cheese block or the speed of the mixer as needed. It's important to avoid applying too much pressure on the cheese block, as this can cause uneven grating and potentially damage the grater attachment.
One common mistake when grating cheese with a mixer is over-processing, which can result in a less desirable texture. To prevent this, it's essential to keep an eye on the grated cheese and stop the mixer as soon as you have the desired amount. If you notice the cheese starting to clump or become too fine, immediately turn off the mixer and remove the cheese block.
For optimal results, it's recommended to grate cheese in small batches, allowing the mixer to process each batch thoroughly before adding more cheese. This approach helps maintain consistent grating and prevents the mixer from becoming overloaded. Additionally, ensure that the mixer and grater attachment are clean and dry before use, as any moisture or residue can affect the grating process.
In summary, operating the mixer for grating cheese involves selecting the right speed, monitoring the grating process, avoiding over-processing, and maintaining the equipment. By following these guidelines, you can achieve perfectly grated cheese every time, enhancing the flavor and texture of your culinary creations.
Safely Shredding Cheese: A Guide to Using Your Electric Grater
You may want to see also
Explore related products


![]()
Cleaning the Grater: Easily disassemble and clean the grater attachment after use
To clean the grater attachment effectively, it's essential to disassemble it properly. Begin by ensuring the grater is completely cool to the touch to avoid any burns. Then, carefully remove the grater from the KitchenAid mixer. This may involve releasing a locking mechanism or unscrewing the attachment, depending on your specific model. Once detached, separate the grater into its individual components, such as the grating surface and any housing or support structures.
Next, focus on cleaning the grating surface itself. This is typically the most challenging part due to the small holes and potential for cheese or food particles to get trapped. Use a soft-bristled brush or a specialized cleaning tool to gently scrub the surface, ensuring you reach all the nooks and crannies. For stubborn residue, you can use a mixture of warm water and mild dish soap, but be sure to rinse thoroughly to avoid any soap residue affecting the taste of future grated foods.
After cleaning the grating surface, move on to the other components. These can usually be washed by hand with warm, soapy water or placed in the dishwasher if they are dishwasher-safe. Check your KitchenAid manual for specific care instructions for each part. Once all components are clean, allow them to air dry completely before reassembling the grater. This will help prevent any moisture buildup that could lead to rust or bacterial growth.
When reassembling, ensure each part is securely in place and that the grater is properly aligned with the mixer's attachment hub. Test the grater by running it briefly without any food to ensure it's functioning correctly and that all components are securely fastened. Regular cleaning and maintenance of your KitchenAid grater attachment will not only prolong its lifespan but also ensure safe and hygienic food preparation.
Creative Ways to Use Cheddar Cheese Powder in Your Cooking
You may want to see also
Frequently asked questions
To attach the cheese grater to your KitchenAid mixer, first ensure the mixer is turned off and unplugged. Then, locate the attachment hub on the front of the mixer. Insert the cheese grater attachment into the hub until it clicks into place. Once securely attached, you can turn on the mixer and start grating cheese.
The KitchenAid cheese grater is versatile and can handle a variety of cheeses. It's ideal for grating hard cheeses like Parmesan, cheddar, and Pecorino Romano, as well as semi-hard cheeses like Gouda and Edam. It may not be as effective for very soft or moist cheeses, as these can clog the grater or not grate evenly.
After using the cheese grater, it's important to clean it thoroughly to prevent any cheese residue from hardening and becoming difficult to remove. First, detach the grater from the mixer. Then, rinse it under warm running water and use a soft brush or sponge to scrub away any remaining cheese. For stubborn residue, you can soak the grater in warm, soapy water for a few minutes before rinsing and drying it completely.


