Making cheese using rennet is a traditional process that involves several key steps. Rennet, an enzyme derived from the stomach lining of ruminant animals, plays a crucial role in cheese production by causing milk to coagulate. To begin the process, milk is first heated to a specific temperature to ensure it is suitable for coagulation. Once the milk reaches the desired temperature, rennet is added, and the mixture is gently stirred to distribute the enzyme evenly. The milk then needs to rest for a period, allowing the rennet to work its magic and form curds. After the curds have formed, they are cut into smaller pieces and stirred to release whey. The curds are then drained, and the remaining whey is removed. The final step involves pressing the curds to expel any remaining whey and shaping them into the desired form. The cheese is then left to age, during which time it develops its unique flavor and texture.
Explore related products


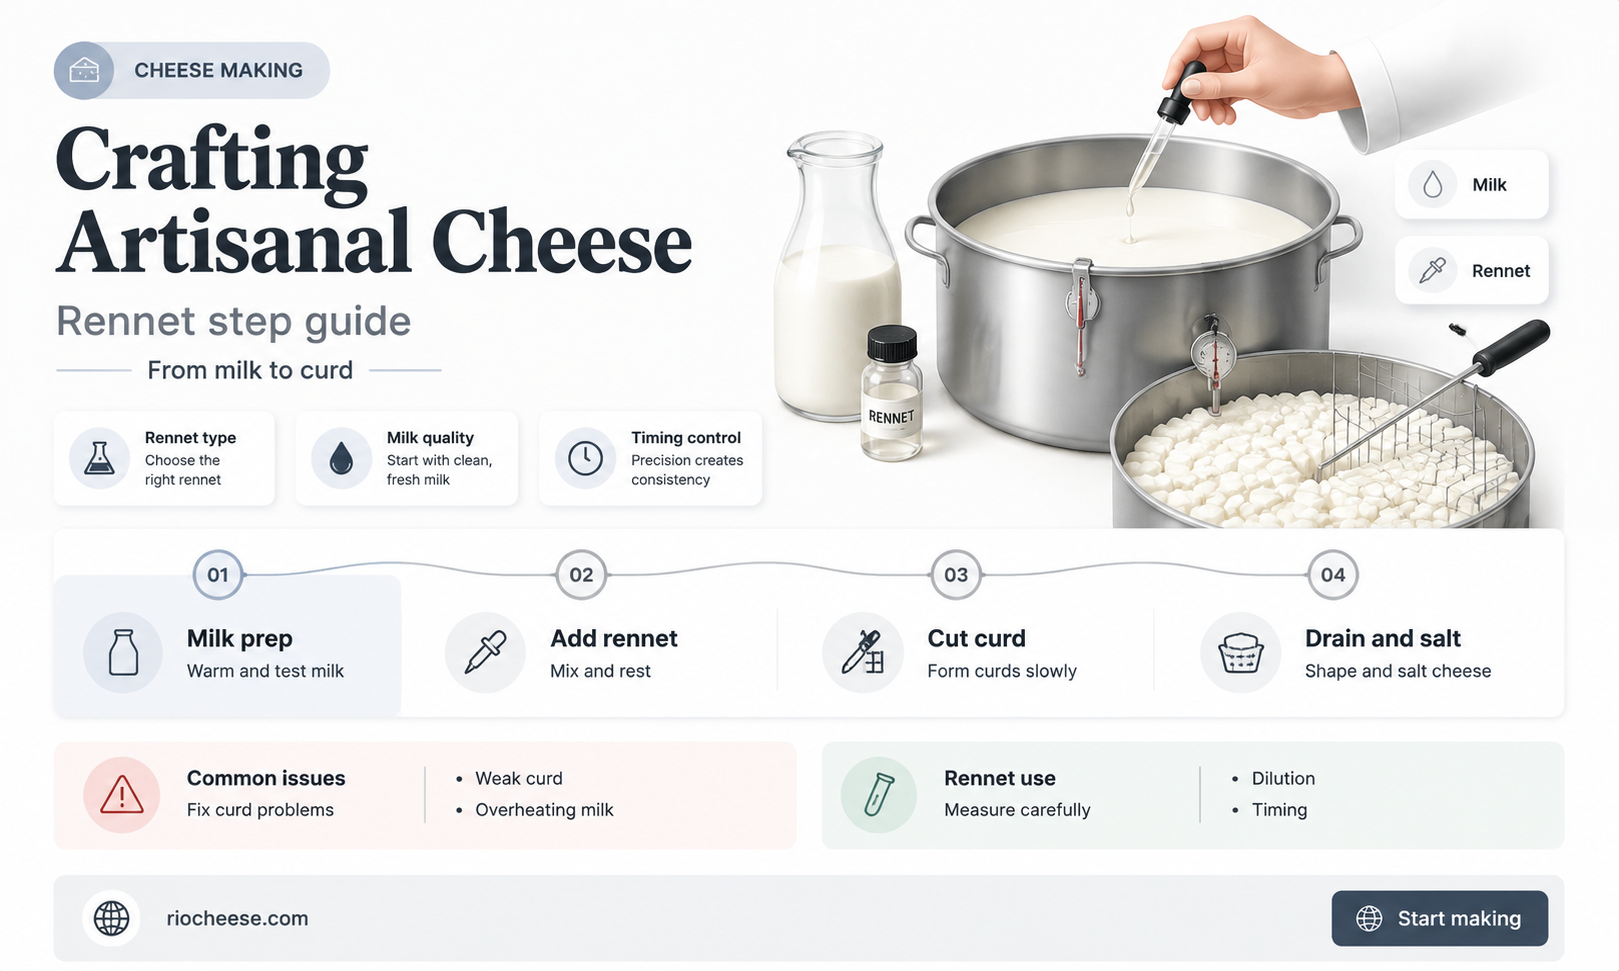
What You'll Learn
- Understanding Rennet: Learn about rennet sources, types (animal, microbial, fungal), and its role in cheese making
- Preparing the Milk: Discover the importance of milk quality, temperature, and acidity for successful cheese making with rennet
- Adding Rennet: Explore the correct dosage, mixing techniques, and waiting time for rennet to coagulate milk effectively
- Draining and Pressing: Find out how to separate curds from whey, and the pressing methods to shape and firm the cheese
- Aging and Storage: Understand the aging process, ideal conditions (temperature, humidity), and how to store finished cheese properly
![]()
Understanding Rennet: Learn about rennet sources, types (animal, microbial, fungal), and its role in cheese making
Rennet is a crucial enzyme complex used in cheese making, responsible for coagulating milk and separating it into curds and whey. Traditionally, rennet was sourced from the stomach lining of young ruminant animals, such as calves, lambs, or kids. This animal-derived rennet contains the enzyme chymosin, which is primarily responsible for its coagulating properties. However, with advancements in biotechnology, microbial and fungal sources of rennet have been developed, providing alternatives to animal-derived rennet.
Microbial rennet is produced through fermentation using bacteria or yeast that have been genetically engineered to express the chymosin gene. This type of rennet is popular among vegetarian cheese makers and those looking to avoid animal products. Fungal rennet, on the other hand, is derived from certain species of fungi that naturally produce chymosin-like enzymes. Both microbial and fungal rennet offer similar coagulating properties to animal-derived rennet, making them suitable substitutes in cheese making.
The role of rennet in cheese making is multifaceted. Firstly, it coagulates the milk, forming a solid mass of curds that can be easily separated from the liquid whey. This process is essential for creating the desired texture and structure of cheese. Secondly, rennet helps to develop the flavor of cheese by breaking down proteins in the milk into smaller peptides, which contribute to the characteristic taste of different cheese varieties.
When using rennet in cheese making, it is important to consider the dosage and timing of its addition. Too little rennet may result in weak coagulation, while too much can lead to over-coagulation and a tough, rubbery texture. The optimal dosage will vary depending on the type of milk being used, as well as the desired cheese variety. Typically, rennet is added to milk that has been heated to a specific temperature, and the mixture is then left to coagulate for a period of time before being cut and drained.
In conclusion, understanding rennet is essential for anyone interested in cheese making. By learning about the different sources and types of rennet, as well as its role in the cheese-making process, cheese enthusiasts can make informed decisions about which rennet to use and how to optimize its effects for the best possible results.
Unveiling the Cheesy Secret: Inside Five Guys' Burger Empire
You may want to see also
Explore related products


![]()
Preparing the Milk: Discover the importance of milk quality, temperature, and acidity for successful cheese making with rennet
The quality of milk is paramount in cheese making with rennet. High-quality milk, rich in proteins and fats, will yield a better texture and flavor in the final cheese product. It's essential to source milk from healthy cows that are well-fed and free from diseases. Additionally, the milk should be fresh and not contaminated with any foreign substances.
Temperature control is another critical factor in the cheese-making process. The milk must be heated to a specific temperature, usually between 85°F and 90°F (29°C and 32°C), before adding the rennet. This temperature range is optimal for the rennet to work effectively and coagulate the milk. If the milk is too hot, it can denature the proteins and affect the cheese's texture. On the other hand, if it's too cold, the rennet may not work properly, leading to a poor curd formation.
Acidity plays a significant role in cheese making with rennet. The milk's pH level should be slightly acidic, around 6.6 to 6.8, to ensure proper coagulation. If the milk is too alkaline, it can hinder the rennet's ability to form curds. To adjust the acidity, you can add a small amount of lemon juice or vinegar to the milk before heating it.
Once the milk is heated to the desired temperature and acidity, you can add the rennet. The amount of rennet used will depend on the volume of milk and the type of cheese you're making. Generally, you'll need about 1/4 to 1/2 teaspoon of rennet per gallon of milk. After adding the rennet, gently stir the milk for a few minutes to ensure even distribution. Then, cover the pot and let it sit undisturbed for about 30 minutes to an hour, or until the curds have formed.
In conclusion, preparing the milk correctly is crucial for successful cheese making with rennet. By ensuring high-quality milk, proper temperature control, and the right acidity, you'll be well on your way to creating delicious homemade cheese. Remember to always follow safety guidelines when handling milk and rennet, and to use clean equipment to prevent contamination.
Delicious Ways to Enjoy Muenster Cheese in Your Meals
You may want to see also
Explore related products


![]()
Adding Rennet: Explore the correct dosage, mixing techniques, and waiting time for rennet to coagulate milk effectively
The correct dosage of rennet is crucial for effective milk coagulation. Too little rennet may result in weak curds that don't separate properly, while too much can lead to overly firm curds that are difficult to work with. As a general rule, use about 1/4 to 1/2 teaspoon of liquid rennet per gallon of milk. However, this may vary depending on the type of milk and the desired consistency of the curds. For example, goat's milk may require a slightly higher dosage than cow's milk. Always follow the manufacturer's instructions for the specific rennet product you are using.
Mixing techniques are also important for achieving the right curd texture. Once you've added the rennet, gently stir the milk in a circular motion for about 30 seconds to ensure even distribution. Avoid vigorous stirring, which can break up the curds and lead to a grainy texture. After stirring, let the mixture sit undisturbed for a few minutes to allow the rennet to work its magic.
The waiting time for rennet to coagulate milk effectively can vary depending on factors such as milk temperature, acidity, and the type of rennet used. Generally, you should expect to wait about 5 to 15 minutes for the curds to form. During this time, keep an eye on the mixture and gently check the curds' consistency by lifting a small portion with a spoon. The curds should be firm but not rubbery. If the curds are not forming properly, you may need to adjust the dosage or mixing technique.
One common mistake to avoid is adding too much rennet in an attempt to speed up the coagulation process. This can lead to overly firm curds that are difficult to drain and may result in a less desirable final product. Instead, be patient and allow the rennet to work at its own pace. If you're unsure about the coagulation process, it's always better to err on the side of caution and wait a bit longer before proceeding to the next step.
In summary, adding rennet to milk is a delicate process that requires careful attention to dosage, mixing techniques, and waiting time. By following these guidelines and being patient, you can achieve the perfect curd consistency for your cheese-making endeavors. Remember, practice makes perfect, so don't be discouraged if your first few attempts don't go as planned. With time and experience, you'll become a pro at using rennet to create delicious homemade cheese.
The Perfect Bread for Your Philly Cheese Steak: A Guide
You may want to see also
Explore related products


![]()
Draining and Pressing: Find out how to separate curds from whey, and the pressing methods to shape and firm the cheese
After the rennet has been added to the milk and the curds have formed, the next crucial step in cheese making is draining and pressing. This process involves separating the curds from the whey, which is the liquid that remains after the curds have coagulated. Draining is typically done by pouring the curds and whey mixture into a cheesecloth or a colander lined with cheesecloth. The cheesecloth allows the whey to drain away while retaining the curds. It's important to ensure that the cheesecloth is clean and free of any contaminants to prevent spoilage of the cheese.
Once the curds have been separated from the whey, they need to be pressed to remove any remaining moisture and to shape the cheese. Pressing can be done using a cheese press or by wrapping the curds in cheesecloth and placing a weight on top. The weight should be heavy enough to press the curds firmly but not so heavy that it crushes them. The pressing process can take several hours, depending on the type of cheese being made and the desired level of firmness.
During pressing, it's important to monitor the curds to ensure that they are not becoming too dry or too wet. If the curds are too dry, they may crumble and not hold their shape well. If they are too wet, they may not firm up properly and could spoil more easily. The ideal moisture content will vary depending on the type of cheese being made.
After the curds have been pressed, they can be shaped into the desired form, such as a wheel, block, or log. The cheese should then be aged in a cool, dry place to allow the flavors to develop and the texture to firm up further. The aging process can take anywhere from a few days to several months, depending on the type of cheese and the desired level of maturity.
In summary, draining and pressing are critical steps in cheese making that involve separating the curds from the whey and shaping the cheese by removing excess moisture. These steps are essential for ensuring that the cheese firms up properly, holds its shape, and develops the desired flavors and textures.
The Salty Secret: Why Salt is Essential in Cheese Making
You may want to see also
Explore related products


![]()
Aging and Storage: Understand the aging process, ideal conditions (temperature, humidity), and how to store finished cheese properly
Cheese aging is a delicate process that requires precise control over environmental conditions to achieve the desired flavor and texture. The ideal temperature for aging cheese varies depending on the type, but generally falls between 50°F and 65°F (10°C and 18°C). Humidity levels should be maintained between 60% and 80% to prevent the cheese from drying out or becoming too moist. Proper air circulation is also crucial to prevent the growth of unwanted mold or bacteria.
Once the cheese has been aged to perfection, it's essential to store it properly to maintain its quality. Hard cheeses should be wrapped in wax paper or plastic wrap and stored in the refrigerator at a temperature between 35°F and 40°F (1.6°C and 4.4°C). Soft cheeses, on the other hand, should be stored in a cooler part of the refrigerator, ideally in a crisper drawer, at a temperature between 30°F and 35°F (-1.1°C and 1.6°C). It's important to note that cheese should not be stored in the freezer, as this can cause the texture to become crumbly and the flavor to deteriorate.
When storing cheese, it's also important to consider the potential for cross-contamination. Strong-smelling cheeses, such as blue cheese or Limburger, should be stored separately from milder cheeses to prevent the transfer of flavors. Additionally, it's recommended to store cheese on a middle shelf in the refrigerator, away from raw meats and other strong-smelling foods.
In terms of aging duration, this can vary greatly depending on the type of cheese being made. Some cheeses, such as Brie or Camembert, are typically aged for only a few weeks, while others, like Parmesan or Cheddar, can be aged for several months or even years. The aging process involves the breakdown of proteins and fats in the cheese, which leads to the development of complex flavors and aromas.
One common mistake in cheese aging is not providing enough time for the cheese to develop its full flavor profile. Patience is key when it comes to aging cheese, and it's important to resist the temptation to cut into the cheese too soon. Another common mistake is not maintaining consistent environmental conditions, which can lead to uneven aging and potentially unsafe cheese.
By understanding the aging process and following proper storage guidelines, cheese makers can ensure that their finished product is of the highest quality and safe to consume.
Delicious Alternatives: What to Use Instead of Butter for Grilled Cheese
You may want to see also
Frequently asked questions
Rennet is a complex set of enzymes produced in the stomachs of ruminant mammals. It is used widely in the dairy industry for cheese-making as it causes milk to coagulate, separating into curds and whey. Traditionally, rennet was derived from the stomach lining of calves, but today, it is often produced through microbial fermentation or genetically engineered processes to be vegetarian-friendly.
Rennet is versatile and can be used to make a wide variety of cheeses, including hard cheeses like Cheddar and Parmesan, soft cheeses like Brie and Camembert, and blue cheeses like Roquefort and Gorgonzola. The type of cheese produced depends on the specific bacteria and molds introduced during the cheese-making process, as well as the aging conditions.
The cheese-making process using rennet involves several key steps. First, milk is pasteurized to kill any harmful bacteria. Then, rennet is added to the milk, causing it to coagulate into curds and whey. The curds are then cut into smaller pieces and stirred to release more whey. After that, the curds are molded into the desired shape and left to age under specific temperature and humidity conditions. During aging, bacteria and molds work on the curds to develop the cheese's flavor and texture.
Yes, there are several alternatives to using animal-derived rennet. Microbial rennet, produced through fermentation using bacteria or fungi, is a popular vegetarian option. Another alternative is genetically engineered rennet, which is produced using recombinant DNA technology. Both of these alternatives are widely used in the cheese industry and produce cheeses that are indistinguishable from those made with traditional animal-derived rennet.