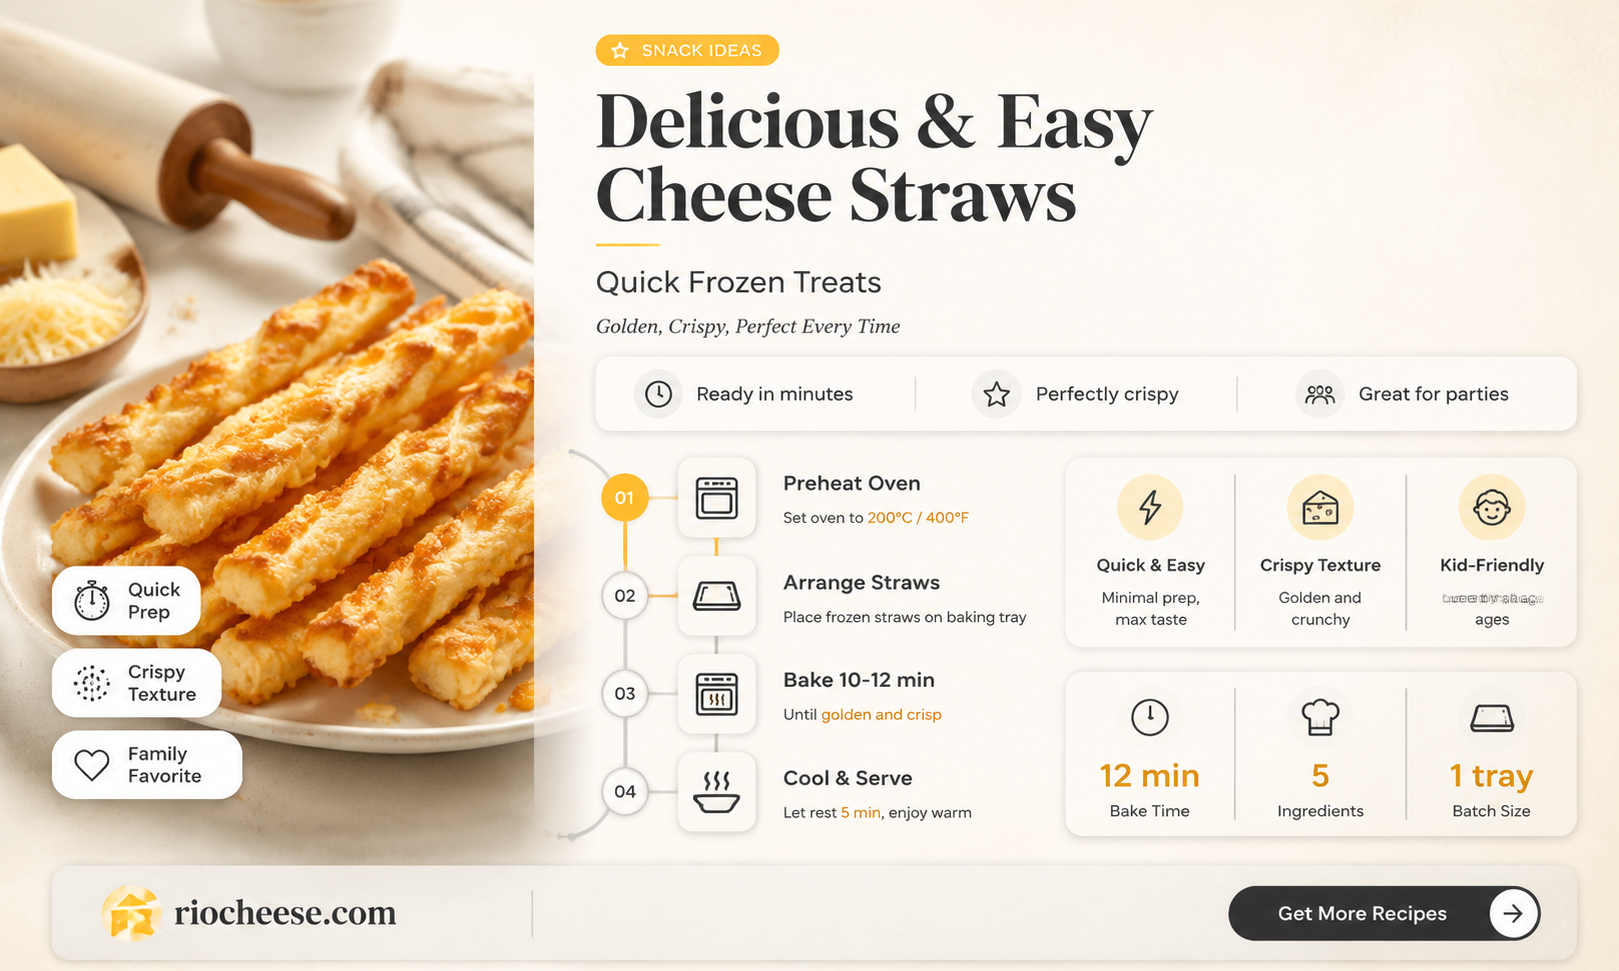
Cooking frozen cheese straws is a quick and easy snack option that can be enjoyed by people of all ages. These crispy, cheesy treats are perfect for parties, game nights, or simply as a satisfying snack. In this guide, we'll walk you through the simple steps to prepare frozen cheese straws, ensuring they turn out perfectly golden and delicious every time. Whether you're using an oven or an air fryer, we've got you covered with our foolproof instructions. So, let's get started and learn how to transform these frozen favorites into a mouthwatering snack!
Explore related products


What You'll Learn
- Preparation: Thawing the cheese straws, if necessary, and preparing the oven or air fryer
- Cooking Methods: Instructions for baking, air frying, or pan-frying the cheese straws to achieve a crispy texture
- Temperature and Time: Specific temperature settings and cooking durations for optimal results
- Serving Suggestions: Tips on how to serve the cheese straws, including dipping sauces and side dishes
- Storage and Reheating: Guidance on storing leftover cheese straws and reheating them to maintain their crispiness
![]()
Preparation: Thawing the cheese straws, if necessary, and preparing the oven or air fryer
Before diving into the cooking process, it's essential to properly prepare the frozen cheese straws. If the cheese straws are frozen, thawing them is a crucial step to ensure even cooking. To thaw the cheese straws, you can either leave them in the refrigerator overnight or place them in a bowl of cold water for about 30 minutes. It's important not to use hot water, as this can start cooking the cheese straws prematurely and lead to uneven texture.
Once the cheese straws are thawed, it's time to prepare the oven or air fryer. Preheat the oven to 375°F (190°C) or the air fryer to 390°F (200°C). If you're using an oven, you may want to line a baking sheet with parchment paper or aluminum foil to prevent sticking and make cleanup easier. For air fryer users, lightly spray the basket with cooking oil to ensure the cheese straws don't stick.
While the oven or air fryer is preheating, you can lightly brush the thawed cheese straws with melted butter or olive oil. This step will help enhance the flavor and give the cheese straws a golden-brown color once cooked. Be careful not to overdo it, as too much oil can make the cheese straws greasy.
Now that the cheese straws are prepped and the oven or air fryer is ready, it's time to arrange them for cooking. Place the cheese straws in a single layer on the prepared baking sheet or air fryer basket, making sure they're not touching each other. This will allow for even cooking and prevent the cheese straws from sticking together.
Before placing the cheese straws in the oven or air fryer, it's a good idea to double-check that they're properly thawed and that the oven or air fryer is at the correct temperature. This will help ensure that the cheese straws cook evenly and achieve the desired crispy texture.
Delicious Oven-Baked Frozen Cheese Ravioli: A Simple Recipe
You may want to see also
Explore related products


![]()
Cooking Methods: Instructions for baking, air frying, or pan-frying the cheese straws to achieve a crispy texture
To achieve a crispy texture when cooking frozen cheese straws, it's essential to follow specific instructions for each cooking method. Here's a detailed guide on baking, air frying, and pan-frying cheese straws:
Baking is a popular method for cooking frozen cheese straws as it allows for even heating and a crispy exterior. Preheat your oven to 425°F (220°C). Remove the cheese straws from the freezer and place them on a baking sheet lined with parchment paper. Bake for 10-12 minutes, or until the cheese straws are golden brown and crispy. It's important to note that baking times may vary depending on the thickness of the cheese straws and the type of oven used.
Air frying is another excellent option for achieving a crispy texture with less oil. Preheat your air fryer to 400°F (200°C). Place the frozen cheese straws in a single layer in the air fryer basket. Cook for 8-10 minutes, shaking the basket halfway through to ensure even cooking. The cheese straws should be golden brown and crispy when done. Air fryers with different wattages may require different cooking times, so be sure to check the manufacturer's instructions.
Pan-frying is a quick and easy method for cooking frozen cheese straws. Heat a non-stick skillet or frying pan over medium-high heat. Add a small amount of oil to the pan and swirl to coat the bottom. Place the frozen cheese straws in a single layer in the pan, being careful not to overcrowd. Cook for 2-3 minutes on each side, or until the cheese straws are golden brown and crispy. Remove from the pan and drain on paper towels to remove excess oil.
Regardless of the cooking method, it's crucial to ensure that the cheese straws are cooked thoroughly to avoid any food safety concerns. Always check the internal temperature of the cheese straws to ensure they have reached a safe minimum temperature of 165°F (74°C). By following these instructions, you can achieve a crispy texture and enjoy delicious, safely cooked frozen cheese straws.
Delicious Frozen Cheese Crepes: A Simple Cooking Guide
You may want to see also
Explore related products


![]()
Temperature and Time: Specific temperature settings and cooking durations for optimal results
To achieve the perfect golden-brown crust on your frozen cheese straws, it's crucial to master the balance between temperature and time. The ideal temperature for baking these snacks is 375°F (190°C). This setting ensures that the cheese melts evenly while the exterior crisps up without burning. When it comes to timing, aim for 12-15 minutes in the oven. Keep an eye on them during this period, as the exact time can vary depending on your oven's efficiency and the thickness of the cheese straws.
For those using a toaster oven, slightly adjust the temperature to 350°F (175°C) and bake for 10-12 minutes. The smaller size of the toaster oven can lead to quicker cooking times, so it's essential to monitor the cheese straws closely to prevent overcooking.
If you prefer a crispier texture, you can increase the baking time by a few minutes, but be cautious not to exceed 18 minutes at 375°F (190°C) to avoid burning. On the other hand, if you want a softer, more cheese-filled center, reduce the baking time to 10-12 minutes at the same temperature.
It's also important to note that the placement of the cheese straws on the baking sheet can affect their cooking. Ensure they are spread out in a single layer with enough space between each straw to allow for even heat distribution. Crowding the baking sheet can lead to uneven cooking and a less desirable texture.
Finally, let the cheese straws cool for a few minutes after removing them from the oven. This brief resting period allows the cheese to set slightly, making them easier to handle and eat without the filling oozing out excessively.
From Freezer to Feast: Mastering the Art of Frozen Cheese Sauce
You may want to see also
Explore related products


![]()
Serving Suggestions: Tips on how to serve the cheese straws, including dipping sauces and side dishes
To elevate your cheese straws from a simple snack to a crowd-pleasing appetizer, consider the art of presentation and accompaniment. One effective serving suggestion is to arrange the cheese straws in a circular pattern on a platter, creating a visually appealing centerpiece. This not only makes it easy for guests to grab one but also allows for a variety of dipping sauces to be placed in the center.
Speaking of dipping sauces, they can greatly enhance the flavor profile of your cheese straws. Offer a selection that complements the rich, cheesy taste, such as a tangy marinara sauce, a creamy ranch dressing, or a spicy sriracha mayo. For a more gourmet touch, you could even prepare a homemade aioli or a flavored oil dip. Remember to provide small bowls or ramekins for the sauces to keep the presentation neat and avoid any mess.
When it comes to side dishes, choose options that balance the indulgence of the cheese straws. A fresh green salad with a light vinaigrette can provide a refreshing contrast, while a bowl of warm, seasoned vegetables like roasted bell peppers or grilled zucchini can add a nutritious element to the meal. If you're looking to create a more substantial spread, consider pairing the cheese straws with a selection of cured meats, olives, and crackers for a charcuterie-style board.
Another tip for serving cheese straws is to keep them warm. If you're preparing them in advance, you can reheat them in the oven or toaster oven just before serving to ensure they maintain their crispy texture. Alternatively, you could use a warming tray or a slow cooker set to low to keep them at the perfect temperature throughout your gathering.
Lastly, don't forget about the beverages. A crisp white wine, a light beer, or a sparkling water with a twist of lemon can all pair well with cheese straws. For non-alcoholic options, consider offering iced tea, lemonade, or a selection of flavored sparkling waters. By paying attention to these details, you can create a memorable and enjoyable experience for your guests.
From Freezer to Feast: Mastering the Art of Frozen Cheese Soufflé
You may want to see also
Explore related products


![]()
Storage and Reheating: Guidance on storing leftover cheese straws and reheating them to maintain their crispiness
To maintain the crispiness of leftover cheese straws, it's crucial to store them properly. After cooling the cheese straws to room temperature, place them in an airtight container or resealable plastic bag. Ensure they are not stacked on top of each other, as this can cause them to become soggy. If possible, line the container or bag with a paper towel to absorb any excess moisture. Store the cheese straws in the refrigerator for up to 3 days.
When you're ready to reheat the cheese straws, preheat your oven to 350°F (175°C). Remove the cheese straws from the refrigerator and let them come to room temperature for about 10 minutes. This step is important as it helps the cheese straws reheat evenly. Place the cheese straws on a baking sheet lined with parchment paper, making sure they are not touching each other. Reheat for 5-7 minutes, or until they are crispy and heated through.
Alternatively, you can reheat cheese straws in an air fryer. Preheat the air fryer to 350°F (175°C) and place the cheese straws in a single layer in the basket. Reheat for 3-5 minutes, or until they are crispy and heated through.
It's important to note that reheating cheese straws in a microwave is not recommended, as it can make them soggy. If you must use a microwave, place the cheese straws on a microwave-safe plate and reheat for 10-15 seconds, checking frequently to avoid overheating.
To ensure the best results, it's recommended to consume reheated cheese straws immediately. If you need to store them for later, follow the same storage instructions as for leftover cheese straws. Remember, proper storage and reheating techniques are key to maintaining the crispiness and deliciousness of your cheese straws.
Oven-Baked Bliss: The Ultimate Guide to Cooking Frozen Cheese Sticks
You may want to see also
Frequently asked questions
The recommended cooking method for frozen cheese straws is baking. Preheat your oven to 375°F (190°C), place the cheese straws on a baking sheet lined with parchment paper, and bake for 10-12 minutes or until golden brown.
While it's possible to cook frozen cheese straws in a microwave, it's not the recommended method as it can result in uneven cooking and a less crispy texture. If you must use a microwave, place the cheese straws on a microwave-safe plate, cover them with a damp paper towel, and microwave on high for 30-45 seconds or until heated through.
It's best to let the cheese straws cool for a few minutes after cooking to allow the cheese to set and prevent burns. This will also help them retain their crispiness.
Some popular dipping sauce options for cheese straws include marinara sauce, ranch dressing, honey mustard, and ketchup. You can also try more adventurous options like garlic aioli or spicy buffalo sauce.


