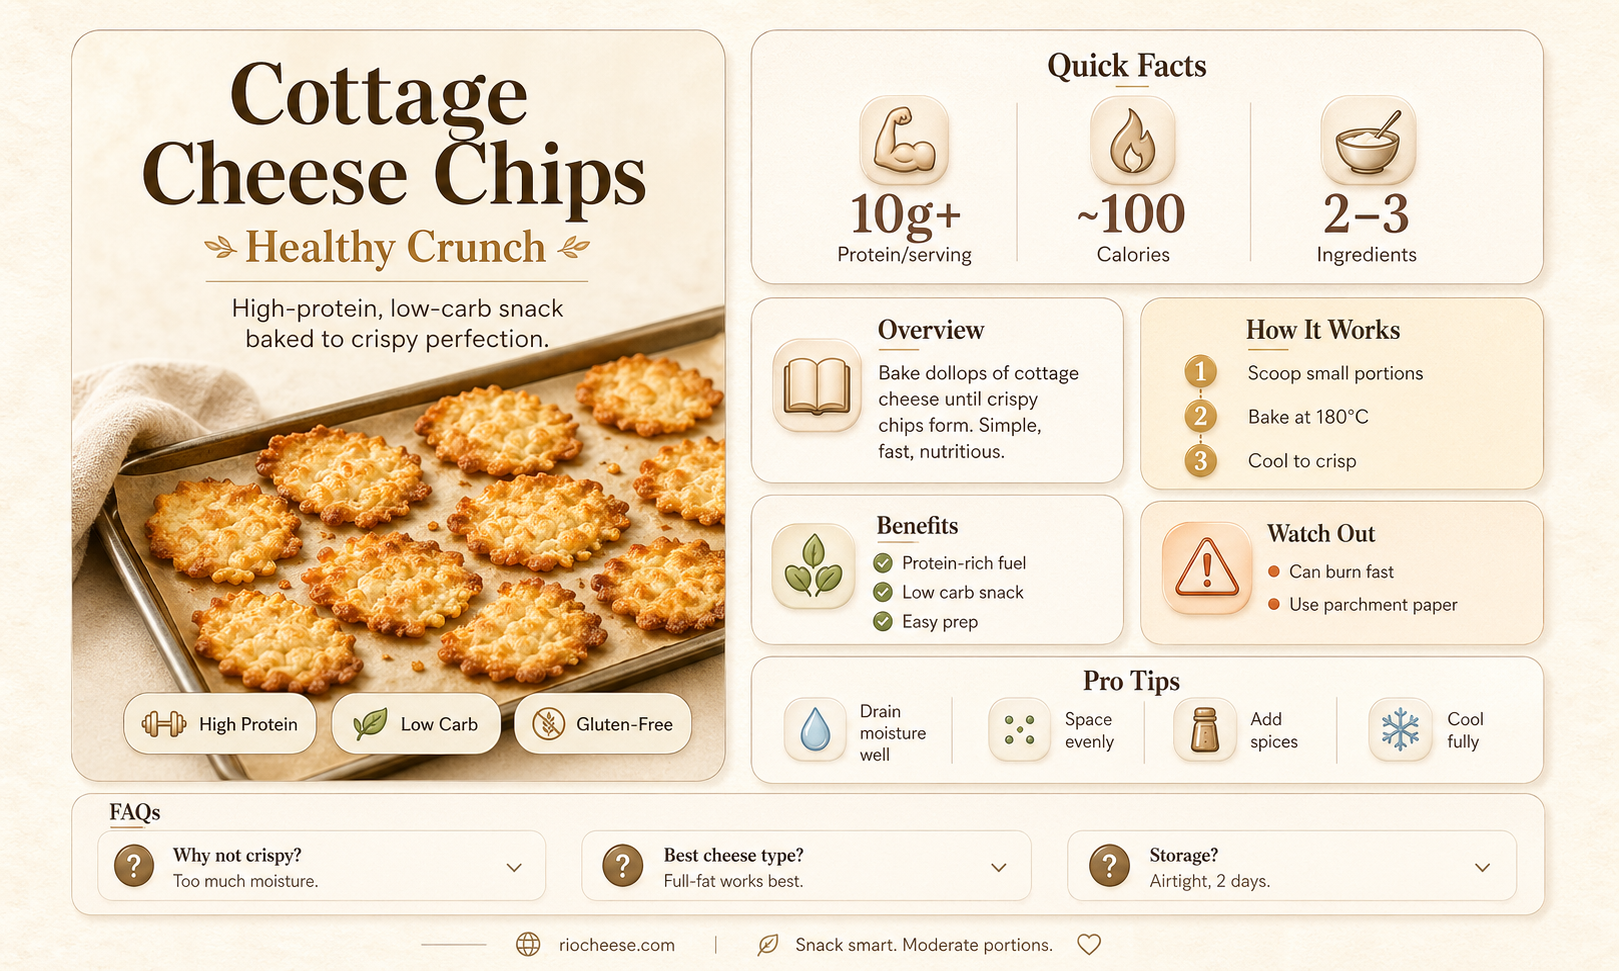
Cottage cheese chips are a delightful and healthy snack option that can be easily prepared in your oven. Made from a mixture of cottage cheese, eggs, and seasonings, these chips offer a crunchy texture and savory flavor that's perfect for satisfying your snack cravings. In this guide, we'll walk you through the simple steps to create your own batch of cottage cheese chips, from mixing the ingredients to baking them to golden perfection. Whether you're looking for a low-carb alternative to traditional potato chips or just want to try something new, cottage cheese chips are a tasty and nutritious choice that's sure to please.
Explore related products


What You'll Learn
![]()
Preparing the Cottage Cheese Mixture
To prepare the cottage cheese mixture for oven-baked chips, begin by selecting a high-quality, full-fat cottage cheese. This choice is crucial as it will impact the flavor and texture of the final product. Full-fat cottage cheese provides a richer taste and helps in achieving a crispier texture when baked. Once you have your cottage cheese, drain it thoroughly to remove excess moisture. This step is essential to ensure that the mixture isn't too wet, which could prevent the chips from crisping up properly in the oven.
Next, transfer the drained cottage cheese to a mixing bowl. Add a pinch of salt and a dash of black pepper to enhance the flavor. You can also incorporate other seasonings or herbs at this stage, such as garlic powder, onion powder, or dried herbs like thyme or rosemary, depending on your taste preferences. Mix the ingredients well to ensure that the seasonings are evenly distributed throughout the cottage cheese.
Now, add a binding agent to the mixture. This could be an egg white or a small amount of flour. The binding agent helps to hold the chips together and gives them a more cohesive texture. If using an egg white, whisk it lightly before adding it to the cottage cheese. If using flour, sprinkle it over the mixture and stir gently until combined. Be careful not to overmix, as this can make the chips tough.
Once the mixture is well combined, it's time to shape the chips. Use a spoon or a small scoop to portion out the mixture onto a baking sheet lined with parchment paper. Flatten each portion slightly with the back of the spoon to create thin, even chips. Make sure to leave some space between each chip to allow for even baking and to prevent them from sticking together.
Finally, preheat your oven to a low temperature, around 200°F (93°C). Place the baking sheet in the oven and bake the chips for about 45 minutes to an hour, or until they are golden brown and crispy. Keep an eye on them as they bake, as the cooking time may vary depending on your oven and the thickness of the chips. Once done, remove the chips from the oven and let them cool completely before serving.
Crafting Creamy Perfection: A Guide to Large Curd Cottage Cheese
You may want to see also
Explore related products


![]()
Forming the Chips
To form the chips, begin by preheating your oven to 375°F (190°C). This temperature is crucial as it ensures the chips bake evenly without burning. While the oven heats up, prepare your cottage cheese mixture. Combine 1 cup of cottage cheese with 1/4 cup of all-purpose flour and 1/4 teaspoon of salt in a mixing bowl. The flour acts as a binding agent, helping the chips hold their shape, while the salt enhances the flavor.
Next, line a baking sheet with parchment paper to prevent sticking and to make cleanup easier. Using a spoon or a piping bag, drop small mounds of the cottage cheese mixture onto the prepared baking sheet, spacing them about 1 inch apart. This spacing is important to allow the chips to spread slightly without merging into each other.
Before placing the baking sheet in the oven, gently press down on each mound with the back of a spoon to flatten them slightly. This step helps create a more uniform shape and ensures even baking. Place the baking sheet in the preheated oven and bake for 20-25 minutes, or until the edges of the chips are golden brown and crispy.
Keep an eye on the chips during the baking process, as they can go from perfectly baked to burnt quickly. Once the chips are done, remove them from the oven and let them cool on the baking sheet for a few minutes before transferring them to a wire rack to cool completely. This cooling process is essential to maintain the chips' crispiness.
Finally, once the chips are completely cool, store them in an airtight container to keep them fresh. They can be enjoyed as a standalone snack or paired with your favorite dips. The key to successful chip formation is attention to detail in both the preparation and baking stages, ensuring that each chip is evenly baked and crispy.
Exploring Kosher Dairy: Is Cottage Cheese on the Menu?
You may want to see also
Explore related products


![]()
Preheating the Oven
To preheat your oven, simply turn it on and set it to the desired temperature. Allow the oven to heat up for at least 10-15 minutes before placing the chips inside. This will ensure that the oven has reached a consistent temperature throughout. If you're using a convection oven, you may need to adjust the temperature slightly lower, as convection ovens tend to cook more quickly and evenly.
While the oven is preheating, you can prepare the cottage cheese mixture and shape it into chips. Once the chips are ready, place them on a baking sheet lined with parchment paper or a silicone baking mat. This will prevent the chips from sticking to the sheet and make them easier to remove once they're cooked.
It's important to note that preheating the oven is not just about reaching the right temperature, but also about ensuring that the oven is clean and free of any debris that could affect the cooking process. Before preheating, take a moment to check the oven for any food particles or spills that may have accumulated during previous use.
In summary, preheating the oven is a critical step in making cottage cheese chips that should not be overlooked. By following the recommended temperature range and allowing sufficient time for the oven to heat up, you can ensure that your chips will cook evenly and achieve the perfect crispy texture.
Creamy Cottage Cheese Ranch Dressing: A Healthier Twist on a Classic
You may want to see also
Explore related products


![]()
Baking the Chips
To achieve the perfect crispiness for your cottage cheese chips, preheat your oven to 375°F (190°C). This temperature strikes a balance between cooking the chips thoroughly and preventing them from burning. Place the chips in a single layer on a baking sheet lined with parchment paper to ensure even cooking and easy removal. Bake for 10-15 minutes, or until the edges are golden brown and the chips are crispy to the touch. Keep an eye on them during the baking process, as the cooking time may vary depending on the thickness of the chips and the specific oven.
While the chips are baking, prepare a dipping sauce to complement their savory flavor. A simple mixture of sour cream, chives, and a squeeze of lemon juice can elevate the taste experience. Alternatively, you can experiment with different seasonings sprinkled on the chips before baking, such as garlic powder, paprika, or dried herbs, to add variety to your snack.
Once the chips are done baking, remove them from the oven and let them cool for a few minutes. This cooling period is crucial, as it allows the chips to firm up and become even crispier. Transfer the cooled chips to a serving bowl or plate, and enjoy them immediately for the best taste and texture. Cottage cheese chips are not only a delicious snack but also a healthier alternative to traditional potato chips, offering a good source of protein and calcium.
Explore related products


![]()
Cooling and Storing the Chips
Once the cottage cheese chips have been baked to a golden-brown crisp, the crucial step of cooling and storing comes into play. This process is vital to maintain the chips' texture and flavor. To cool the chips effectively, spread them out in a single layer on a wire rack. This allows air to circulate around each chip, preventing them from becoming soggy. It's important to let them cool completely before storing, as any residual heat can cause moisture to build up inside the storage container.
When it comes to storing the chips, choose an airtight container to keep them fresh. Glass jars or resealable plastic bags work well. If you're planning to store them for an extended period, consider adding a silica gel packet to the container to absorb any excess moisture. Store the container in a cool, dry place away from direct sunlight. The pantry or a cupboard is ideal. Avoid storing them in the refrigerator, as the temperature fluctuations can cause condensation, leading to sogginess.
To ensure the chips retain their crunch, it's a good practice to consume them within a week or two of baking. If you notice any chips becoming stale or losing their crispness, you can revive them by placing them back in the oven at a low temperature (around 300°F or 150°C) for a few minutes. This will help to re-crisp them without burning.
In terms of portion control, it's helpful to divide the cooled chips into smaller serving sizes before storing. This not only makes it easier to grab a snack on the go but also helps to prevent overeating. Labeling the container with the date of baking can also be a useful tip to keep track of freshness.
Lastly, consider experimenting with different flavors or seasonings before storing. This can add variety to your snack options and make the chips more appealing. You can toss them with herbs, spices, or even a light coating of olive oil and salt. Remember to let any seasoned chips cool completely before storing to prevent the oils from making them soggy.